
Night Trail Essentials: A Buyer's Guide to Off-Road Lighting
Running trails after dark changes everything. Stock headlights weren't designed for rock crawling or high-speed desert runs. Off-road lighting transforms night driving from risky to confident. This guide covers what to buy first and how to build a functional lighting setup for your Jeep or truck.
Start With LED Technology
LED lights dominate off-road applications for good reasons. They draw less power than older technologies, produce minimal heat, and deliver superior brightness. LEDs also handle vibration and impact better than halogen or HID alternatives.
HID lights offer maximum distance and brightness for high-speed desert running, but they require warm-up time and draw more power. Halogen bulbs are cheap but inefficient, producing excessive heat that shortens their lifespan.
For most Jeep and truck owners, LED lighting provides the best balance of performance, durability, and value. Quality LED bars last years with minimal maintenance.
Understanding Beam Patterns
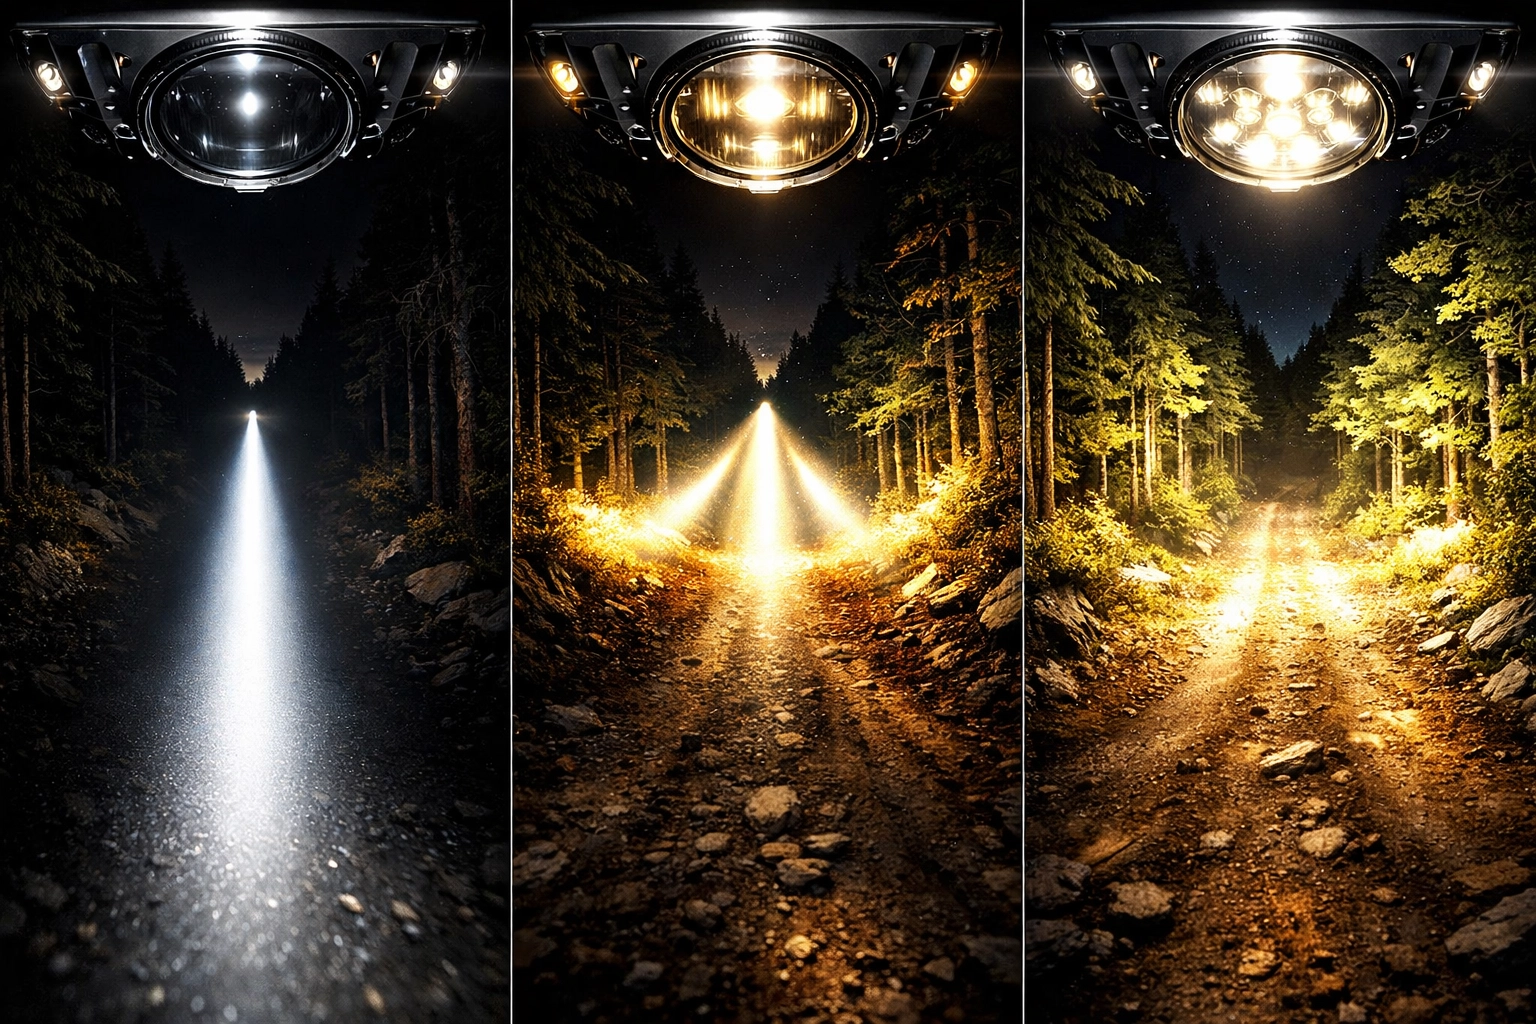
Off-road lighting uses two primary beam patterns that serve different purposes.
Spotlights create focused, long-distance beams. They reach far down the trail, making them essential for high-speed runs and spotting obstacles early. Spotlights work like laser beams cutting through darkness.
Floodlights spread wide, short-range illumination. They light up the immediate area around your vehicle, perfect for slow technical sections and tight turns. Floodlights eliminate blind spots close to your truck.
Most effective setups combine both patterns. Spotlights handle distance visibility while floodlights cover peripheral areas. Combination light bars include both beam types in one unit, simplifying installation.
What to Buy First: The Priority System
Building an off-road lighting system works best when you prioritize based on immediate needs.
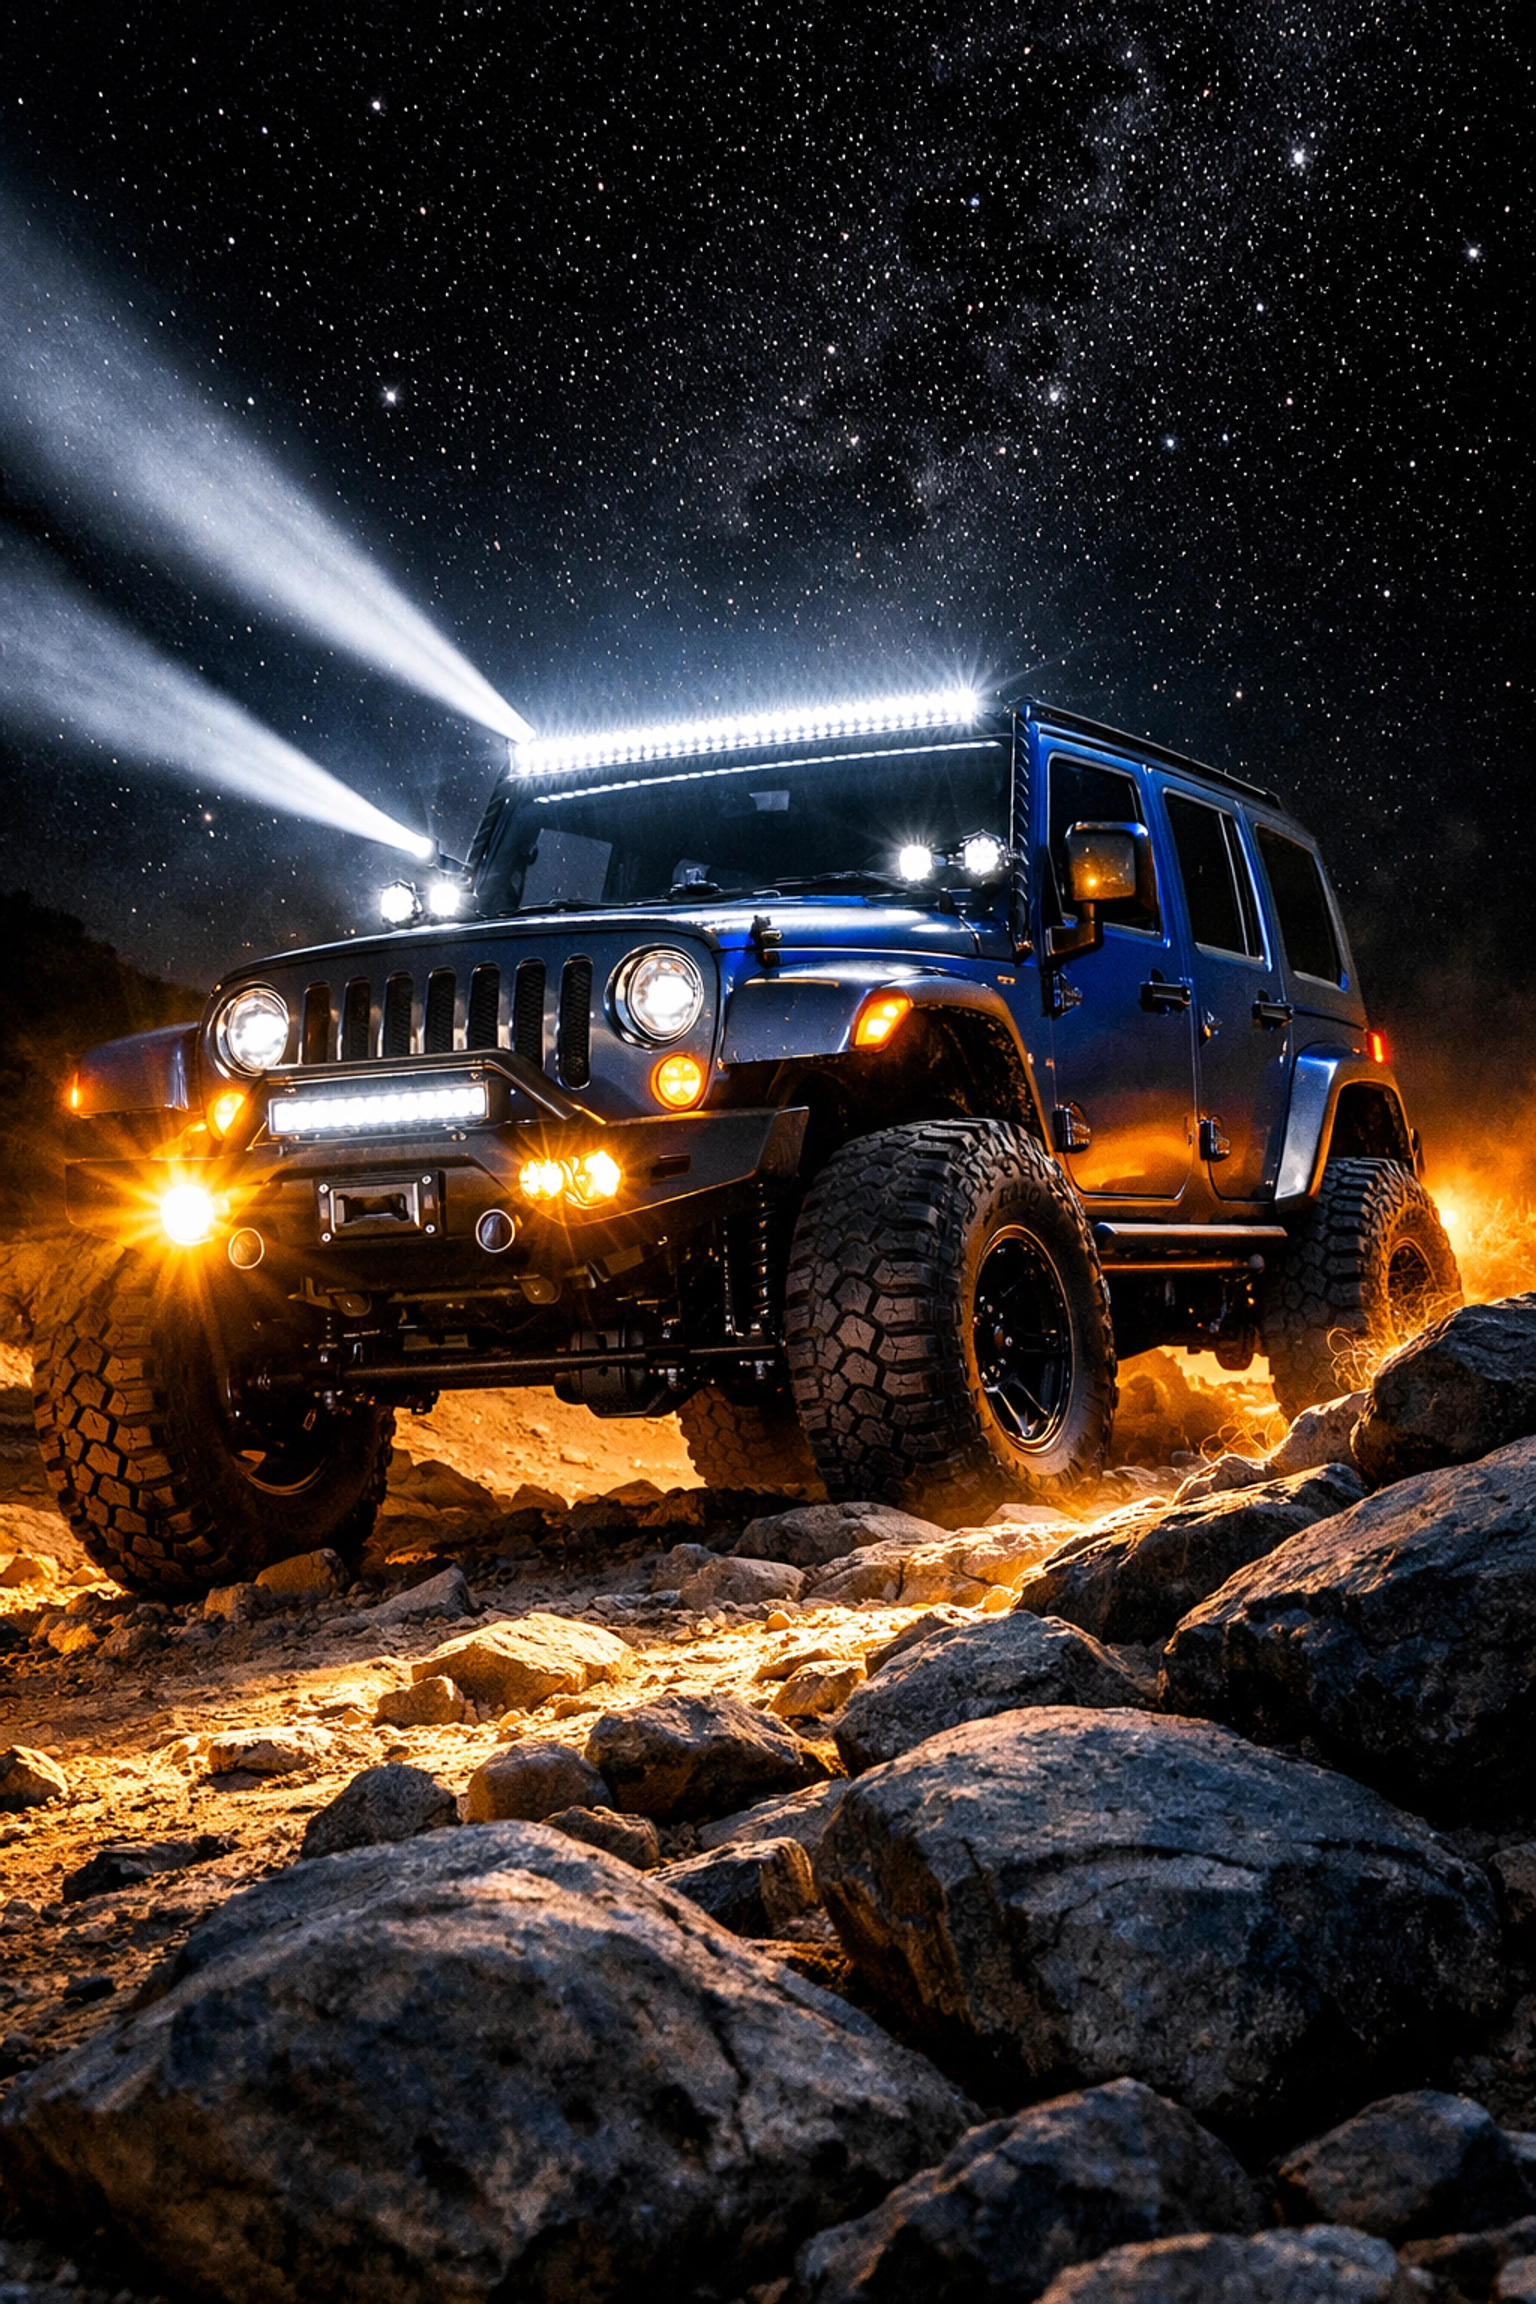
Priority 1: Bumper-Mounted Light Bar
A front bumper light bar provides the biggest improvement for most drivers. Mount a 20-30 inch LED bar on your front bumper for balanced forward visibility. This single upgrade transforms night trail capability.
Bumper mounting offers practical advantages. The lights sit lower than roof-mounted options, reducing shadows on uneven terrain. You can angle bumper bars to match specific trail conditions. They also avoid the height restrictions that affect roof-mounted setups.
Look for bars delivering 3,000 to 6,000 lumens minimum. Choose models with efficient heat dissipation to maintain performance during extended runs.
Priority 2: Ditch Lights or A-Pillar Pods
After establishing forward visibility with a bumper bar, add side-mounted lights. Ditch lights (mounted near the hood/fender junction) or A-pillar pods eliminate blind spots during turns.
These lights provide 180-degree illumination, showing trail edges and obstacles your main lights miss. They're particularly valuable on tight forest trails where spotting the next turn happens quickly.
Pod lights offer compact, focused beams perfect for filling specific gaps in your lighting coverage. They mount almost anywhere and angle easily for precise aim.
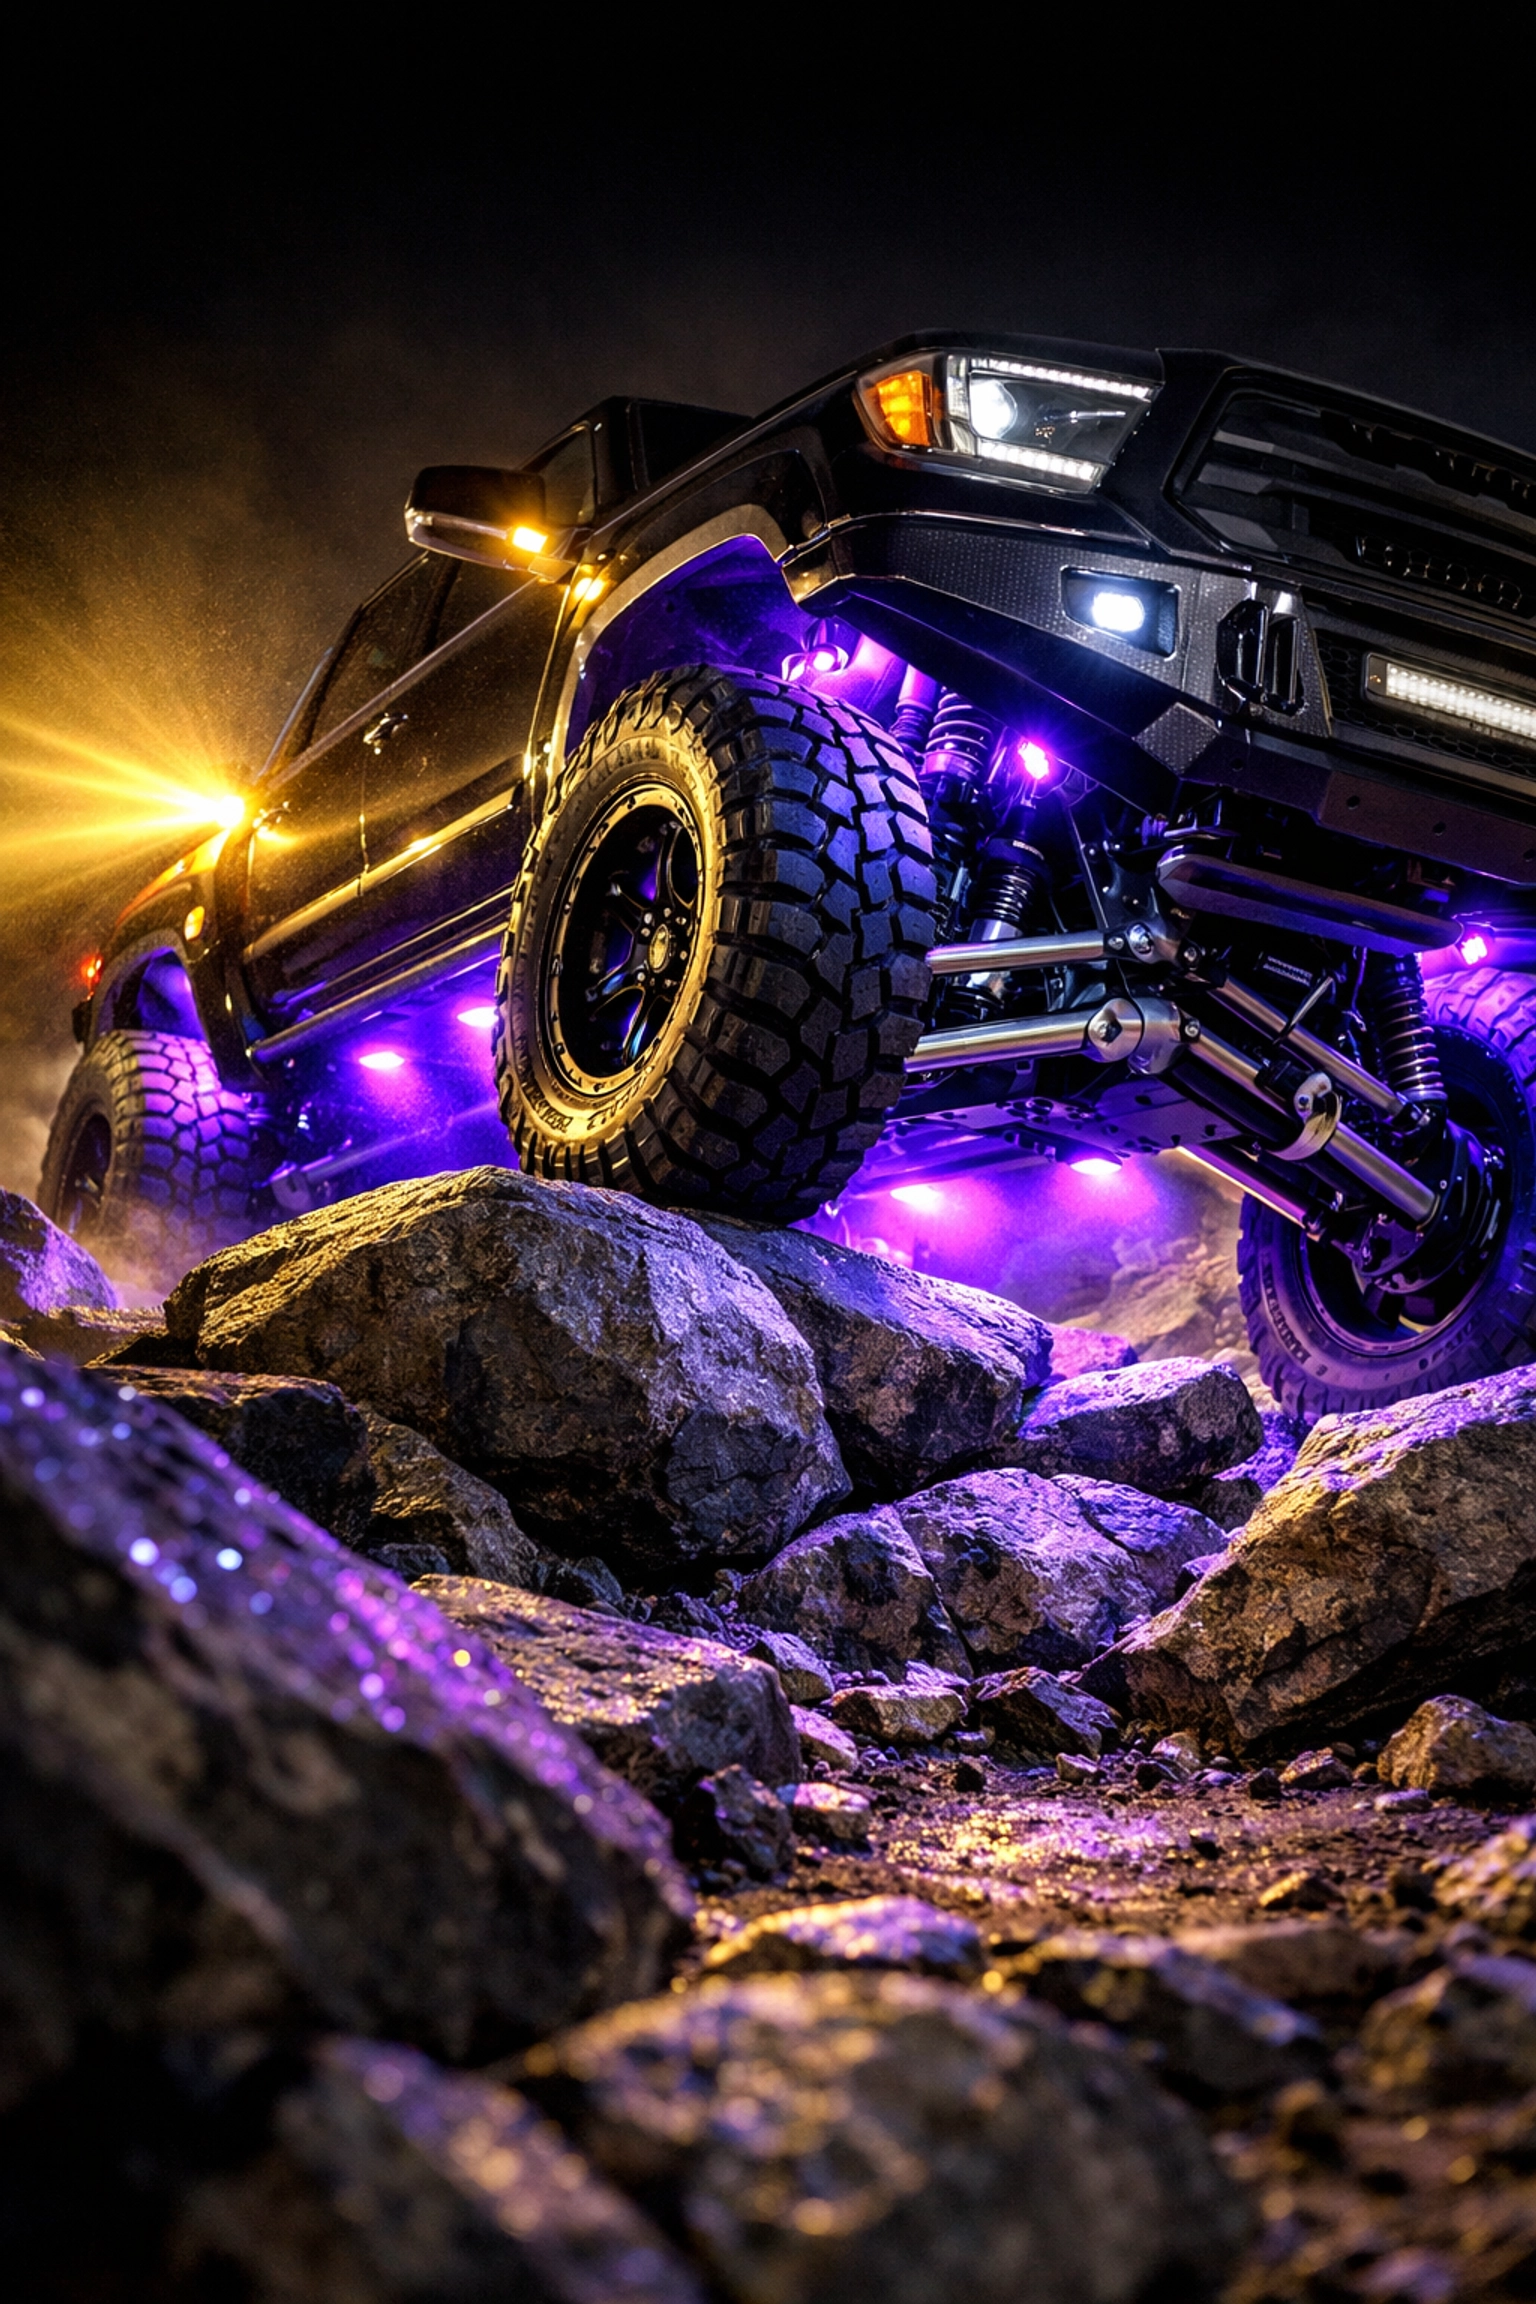
Priority 3: Rock Lights
Rock lights mount in wheel wells, illuminating the ground immediately around your tires. For rock crawling and technical terrain, they're essential safety equipment.
These small LED pods show obstacles that would otherwise remain hidden beneath your vehicle. When navigating boulder fields or steep ledges at night, rock lights prevent costly mistakes.
Rock lights also help when backing up to reposition for difficult sections. Rear-mounted pod lights serve similar purposes, showing what's behind your truck when you need to reverse.
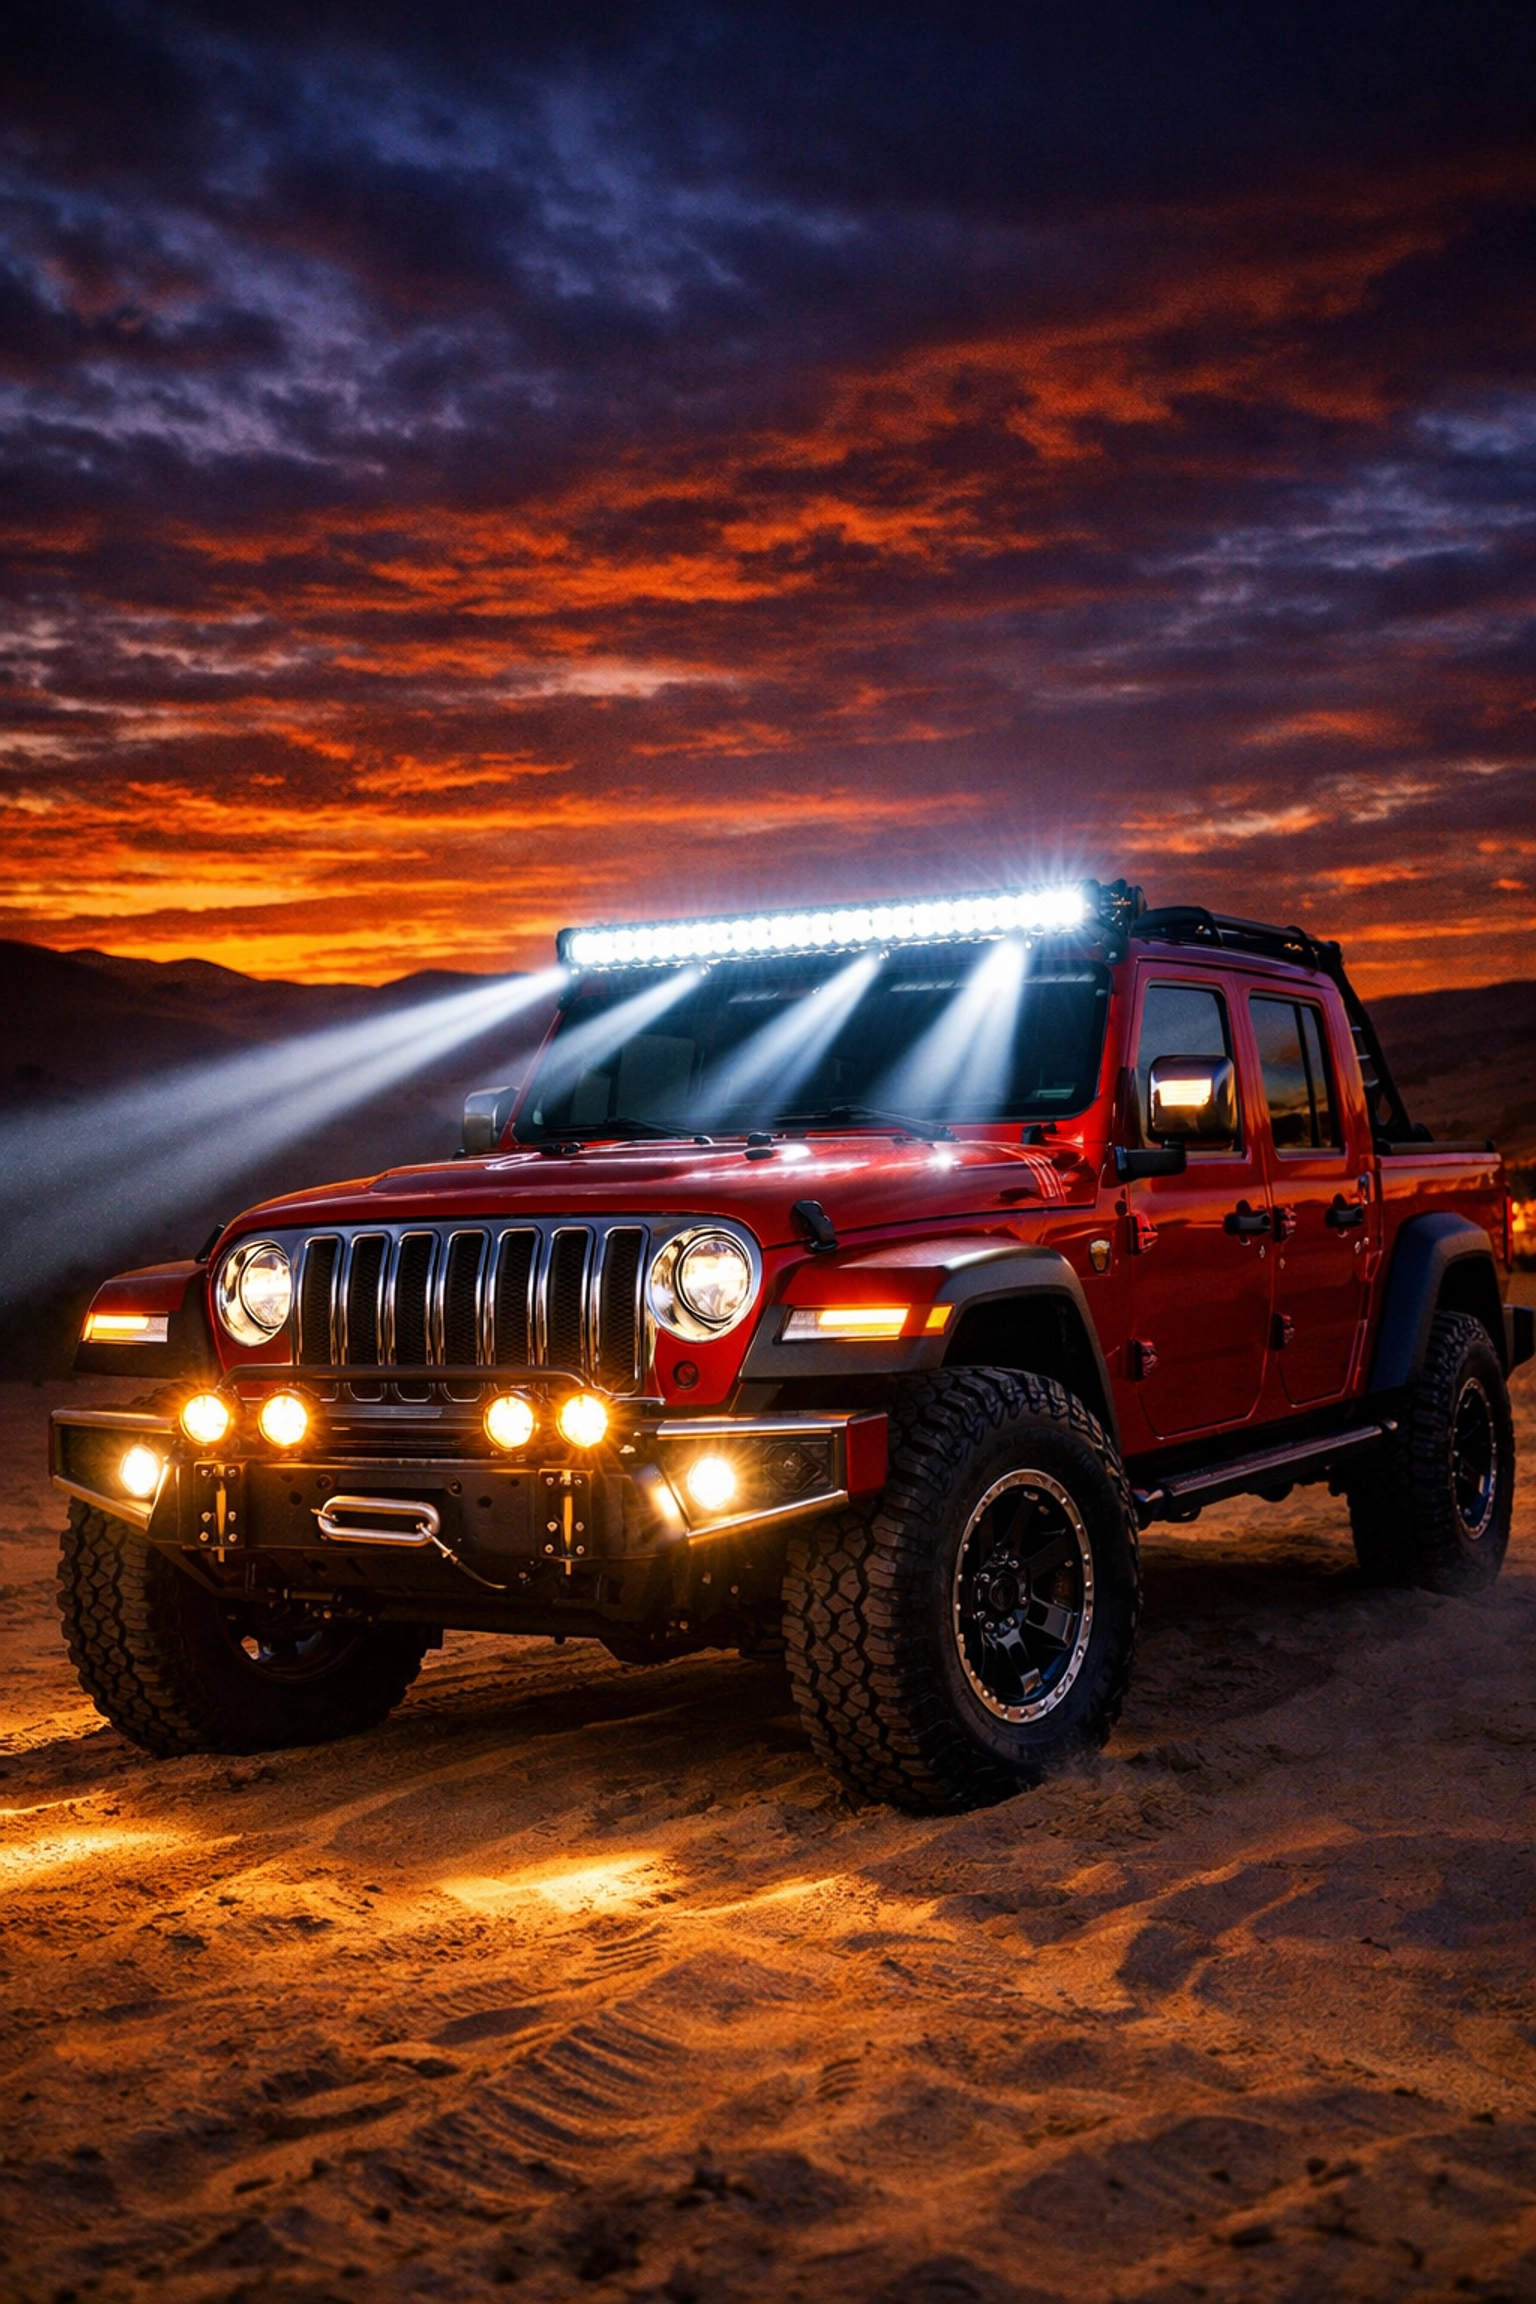
Priority 4: Roof-Mounted Light Bar
Roof bars provide excellent long-distance visibility on straight sections. They function as supplemental high beams for fast desert runs or open trail stretches.
However, roof mounting creates shadows on winding trails because the lights sit above terrain variations. They work best combined with lower-mounted lights that fill in close-range illumination.
Roof bars also increase vehicle height, potentially causing clearance issues in parking garages or on trailers. Consider your daily driving needs before installing roof-mounted lighting.
Terrain-Specific Recommendations
Different environments require different lighting strategies.
Forest Trails: Combine bumper lights for forward visibility with ditch lights for edge detection. Floodlight patterns work better than spotlights in tight spaces. Add rock lights if your trails include technical rock sections.
Desert and Open Terrain: Focus on powerful, far-reaching spotlights. A roof-mounted bar supplements bumper lighting for maximum distance visibility at speed. Floodlights matter less in open environments.
Rock Crawling: Prioritize bumper-mounted floodlights to eliminate shadows on uneven terrain. Rock lights in all four wheel wells show obstacles around your tires. Slow speeds mean distance spotlights are less critical.
Mixed Terrain: Build a balanced system with combination beam patterns. A 20-30 inch bumper bar with spot and flood patterns, plus ditch lights and rock lights, handles most situations effectively.
Technical Specifications That Matter
When shopping for off-road lighting at DIY Customs Store, focus on these key specifications:
Lumens: Aim for 3,000-6,000 lumens minimum for primary light bars. More lumens increase visibility but also draw more power.
IP Rating: Look for IP67 or IP68 ratings indicating water and dust resistance. Off-road lights must handle mud, water crossings, and debris impacts.
Heat Dissipation: Quality housings with efficient heat sinks maintain LED performance during extended use. Poor heat management shortens LED lifespan.
Mounting Hardware: Adjustable mounts allow precise beam aiming. Solid mounting systems resist vibration that can loosen connections or damage lights.
Wiring and Switches: Proper wiring with adequate gauge prevents electrical issues. Use dedicated switches with proper fuses to protect your electrical system and lights.
Installation Considerations
Proper installation maximizes lighting effectiveness and prevents problems.
Aim beams slightly downward and outward, aligning light with where your eyes scan next. Lights aimed too high create glare without improving trail visibility.
Protect wiring from heat, abrasion, and moisture. Route cables away from exhaust components and moving parts. Use grommets when passing wires through metal panels.
Verify your electrical system can handle additional lighting loads. Most modern trucks and Jeeps accommodate aftermarket lights without issue, but adding multiple high-power bars may require electrical upgrades.
Consider using a relay harness to reduce load on factory switches. Relays also provide cleaner power delivery to your lights.
Maintenance and Care
Off-road lighting requires minimal maintenance but benefits from regular attention.
Clean lenses and reflectors after muddy or dusty runs. Grime buildup reduces light output significantly. Use mild soap and soft cloths to avoid scratching lenses.
Check mounting hardware periodically. Vibration can loosen bolts over time. Tighten mounting points before they cause damage.
Inspect wiring connections for corrosion or damage. Protect exposed connections with dielectric grease to prevent moisture intrusion.
Building Your System
Start with a quality bumper-mounted light bar as your foundation. This single addition provides the biggest improvement in night trail capability.
Add side-mounted ditch lights or pods next to eliminate blind spots and improve peripheral vision on tight trails.
Include rock lights if you regularly navigate technical terrain where ground-level visibility matters.
Consider a roof-mounted bar for desert running or open terrain where distance visibility is critical.
DIY Customs Store ships off-road lighting solutions to all 50 states with free shipping on orders over $200. Whether you're building a basic setup or a comprehensive lighting system, we serve automotive enthusiasts nationwide with competitive pricing and fast delivery.
Check the outlet clearance section for discounted premium lighting from top brands. Scratched or dented lights function perfectly while saving significant money.
Final Recommendations
Quality off-road lighting transforms night trail capability. Start with essentials: bumper bar and ditch lights: then expand based on your terrain and driving style.
LED technology provides the best combination of performance, durability, and efficiency for most applications. Combine spotlight and floodlight patterns for comprehensive coverage.
Order from DIY Customs Store for nationwide shipping, expert guidance, and access to premium lighting systems. Our Pittsburgh headquarters supports customers across America with the products and advice needed for successful installations.
Proper lighting setup means confident night driving regardless of terrain. Build your system strategically, prioritize based on your needs, and maintain equipment regularly for years of reliable performance.
SEO Keywords: off-road lighting, LED light bars, Jeep lighting, truck lighting upgrades, ditch lights, rock lights, bumper light bar, off-road LED lights, night trail lighting, 4x4 lighting system
Meta Description: Complete buyer's guide to off-road lighting for Jeeps and trucks. Learn what to buy first, understand beam patterns, and build an effective lighting system. Ships nationwide with free shipping over $200.
Excerpt: Building an effective off-road lighting system starts with understanding priorities. This buyer's guide covers what to purchase first for your Jeep or truck, from essential bumper bars to specialized rock lights, helping you navigate trails confidently after dark.